TrueNCOA Integrated File Transfer (SFTP) Service
The TrueNCOA Integrated File Transfer (SFTP) Service is a fast and easy way to securely upload your files directly to TrueNCOA and receive your processed file back directly in the same location.
Get a TrueNCOA Account
To use the TrueNCOA SFTP Service, you need to have an active account in either testing or production.
Register for an account to get started or use your existing application username and password.
-
Production - https://app.truencoa.com/users/register
Quick Start Steps
- Login to your SFTP account
- Upload your file
- File is created
- Once all data is transferred, file is processed
- Once file is processed, an export file will appear in your SFTP account
- Download your file from the SFTP
- If you have credits already in your account, the system will deduct credit(s) automatically
- If you have 0 credits, and no saved, default card, your file will not download
- If you have 0 credits and a saved, default card,
- the system will attempt to charge your default credit card and deduct the credits immediately
- you will receive a receipt via email
- Downloaded file will appear in the folder you specified
- CASS Report and NCOA Report will appear in your SFTP folder
SFTP File Processing
The following information that is provided will reference and provide screenshots using FileZilla. TrueNCOA recommends using FileZilla, but you may use your own preferred SFTP client.
Purchase Credits
To download your processed file, you must first purchase credits. TrueNCOA uses a credit system to purchase downloads. In this system, per file pricing is $20 (1 credit) per 2 million records per file. Purchasing credits is quick and easy. Users can add credits whenever they want and will only be prompted to purchase a credit after they attempt to download a file when their account has zero credits available.
Users can set up and save a default credit card within the app. When you purchase credits, you will now see a Save Card checkbox. Check this box, if you would like to save this credit card to your TrueNCOA account and purchase your credits. Next, navigate to your User page by clicking the User Icon located next to the Credit Counter.
On this page, you will see your saved credit card. Check the Default box for the credit card you would like to use for automatic purchasing via SFTP. You will see a confirmation when you have successfully updated your payment preferences.
If you set up Default Credit Card purchasing, your credit card will be charged during the Download Data call. Your credit card will be charged $20, and you will receive 1 credit. This credit will then be automatically used to download your current file. You will receive a receipt via email.
Remember, you do not have to set up a Default Credit Card. You can always purchase bulk credits in app.truencoa.com or by contacting support@truencoa.com.
Test Credits
To download your file in the testing environment, you must have at least one (1) credit in your account to download your file. You can purchase a credit by using a test credit card:
Card # 4242 4242 4242 4242
Expiration Date: Must be a future date - MM/YY
CVC: 123
Purchasing a credit allows you to download your test file and to review your results. We require you to use test credits, so that when you switch to production, it will be as seamless as possible.
Prepare your File
When processing through the SFTP, we require your data be formatted a certain way. Not formatting your files this way, will prevent them from processing.
File Headers
The following headers must be used to process your data through the SFTP. This allows the process to automatically map your fields to the service and send it for processing.
| Field Header | Value |
| individual_id | Your internal record id for this record (optional) |
| individual_first_name | Person's first name (required) |
| individual_middle_name | Person’s middle name (optional) |
| individual_last_name | Person's last name (required) |
| individual_suffix | Person’s suffix (optional) |
| individual_full_name | Person's full name (this should be used in place of individual_first_name and individual_last_name)(required) |
| address_line_1 | Primary address or line one (required) |
| address_line_2 | Address unit or second line (optional) |
| address_city_name | Address city (required) |
| address_state_code | State abbreviation, 2-digit only (required) |
| address_postal_code | Postal/zip code (required) |
NOTES:
- for individual_first_name, individual_last_name, individual_full_name - either individual_first_name and individual_last_name (2 fields) must be used or just individual_full_name (1 field)
- using individual_full_name will turn our name parsing feature on automatically
- for address_city_name, address_state, and address_postal_code - either (address_city_name and address_state) OR (address_postal_code ) is required
- address_state_code must be 2 digits
- Pass-throughs or additional fields not listed above are not allowed.
File Types
The SFTP accepts the following file types:
- comma separated values (csv)
- tab delimited (txt)
The SFTP does not accept the following file types:
- excel xlsx files
- excel xls files
- zip files
Connect to the SFTP Server
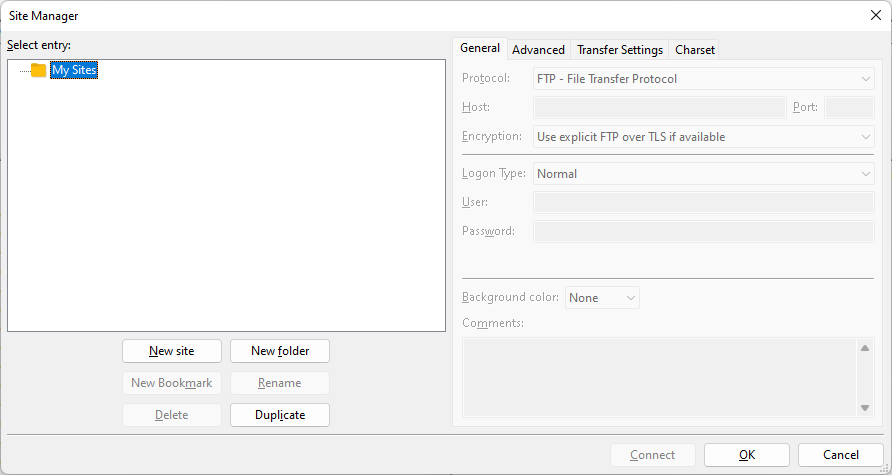
Open FileZilla, and click File>Site Manager. You can also click the Site Manager icon located below the File tab.
SFTP Clients
We recommend FileZilla for SFTP processing.
Authentication
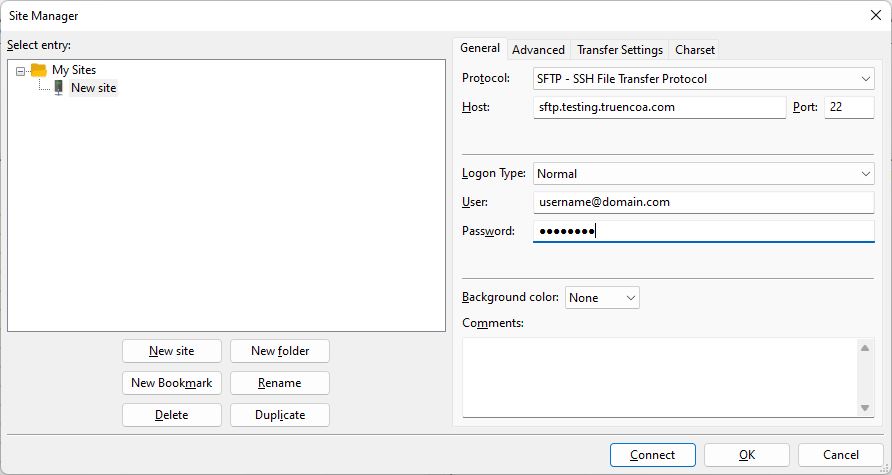
To login to your SFTP account, you can use the following information:
| Value | |
|---|---|
| Protocol | SFTP |
| Host | Testing - sftp.testing.truencoa.com
Production - sftp.truencoa.com |
| Port | 22 |
| Logon Type | Normal (username and password) |
| User | your TrueNCOA username |
| Password | your TrueNCOA password |
If you are creating a new site to connect to TrueNCOA testing in FileZilla.
Click on File > Site Manager, or the icon in the top left of the toolbar.
Click “New site” and enter in the following information (for production use the host listed above - sftp.truencoa.com)
Either choose “Connect”, or “OK” to save the new site. You can then just choose the site and click “Connect” later.
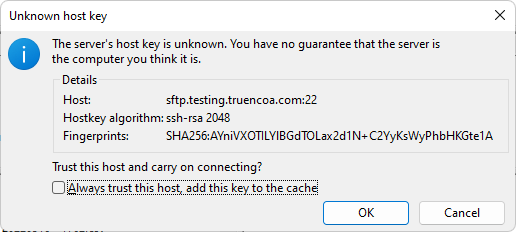
If you chose to connect, you will receive the following notification to verify the host key:
You can choose to “Always trust this host, add this key to the cache” or just click “OK” to continue.
Once connected, you’ll see the message log output in the top section of FileZilla. This section will help you to understand what is happening within the SFTP and if you are receiving errors or if different commands are successful.
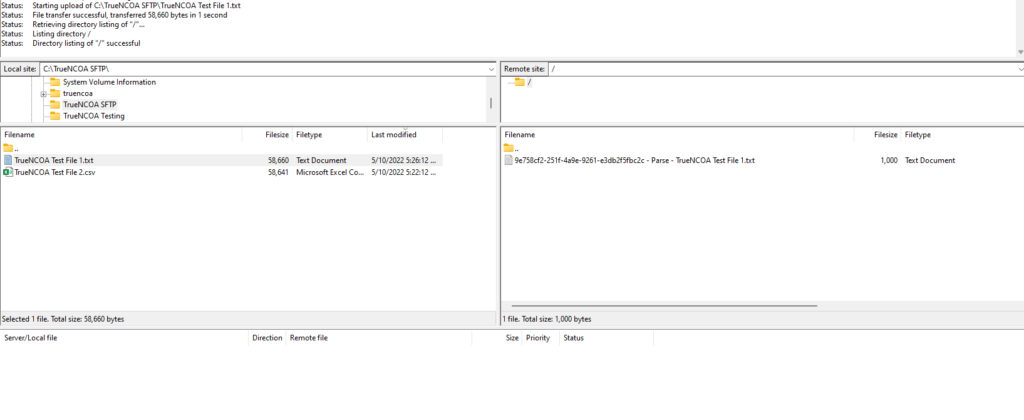
You should receive a status of Directory listing of “/” successful.
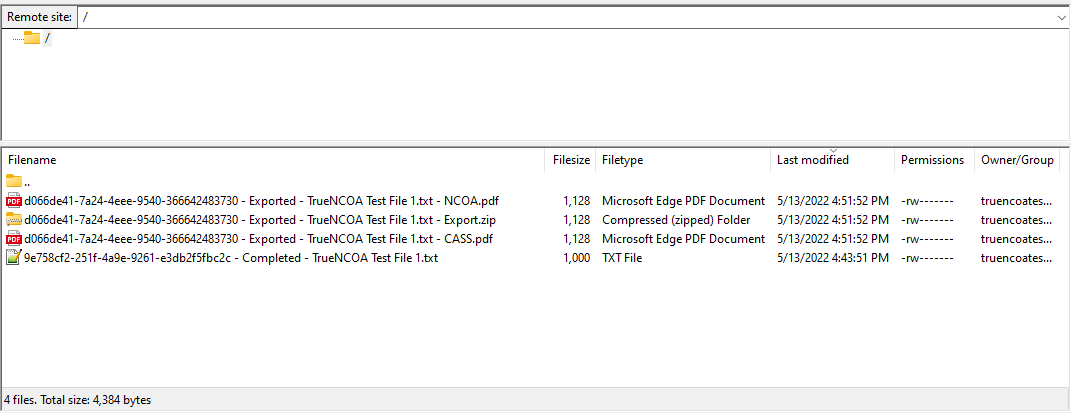
You will see the same file listing as the application:
The fields displayed are:
- Filename - the name of the file, with the following fields, separated by hyphens
- UUID - unique id of the file, this is what is displayed in the address bar of your browser when viewing a file in the application
- Status - the status of the file
- Name - the unique name of the file you created
- NOTE: export files will have “ - Export” in the file name, and the following report files will be visible once the export file has been downloaded
- Filename + “ - CASS.pdf” - the CASS report
- Filename + “ - NCOA.pdf” - the NCOA report
- Filesize - the number of records in the file
- Filetype - the type of file
- All import files are either CSV or TXT
- All export files are ZIP
- All report files are PDF
- Last modified - create date of file
- Permissions - always read/write (“rw”)
- Owner/Group - the username of the user that created the file
Import and Process Your File
Create File and Upload
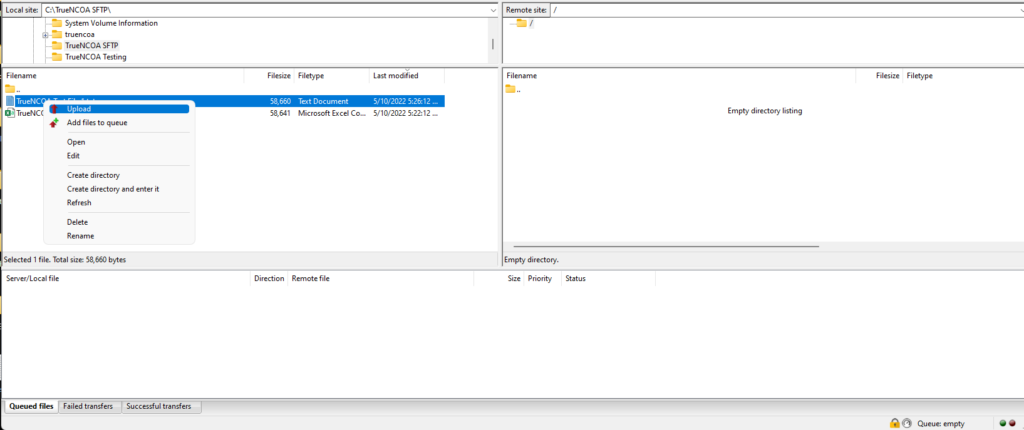
- Access your file through the local site within the SFTP Client or server
- Upload the file
NOTE: a unique import file name will help distinguish between files during export
- You’ll see your file in the Remote Site section when it has uploaded
- data-renderer-start-pos="8041">You’ll also see a successful transfer in the logs
File Processing
- Your file will automatically be created, imported, and processed in TrueNCOA
- You can view the files process in the TrueNCOA application
- You can also view your files status in the file name within the sftp client
- When your file has completed, it will have a status of Completed and an Export file will appear within your SFTP
Download Processed File
When you are ready to download your results, make sure you have the correct amount of credits in your account or you have a saved, default card on your account.
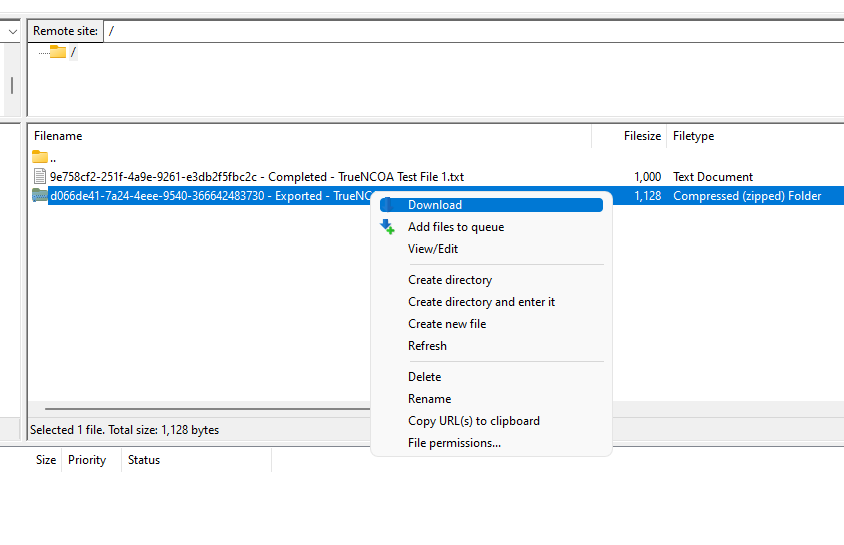
- Select the location in the local host section of where you would like your file to be downloaded
- Download the Export File
- The system will apply the credit(s) and your Download file will appear in the specified location
- Once your file has successfully downloaded, your CASS Report and NCOA Report will become available on the SFTP client. You can now download these to your local computer
Export Templates
The SFTP service, by default, will download the TrueNCOA default template. If you are interested in a custom export template or interested in always downloading one of our other export templates, please contact support@truencoa.com
Our team can assign or create a special export template to meet your needs.
Delete Files
You have the full ability to delete files through the sftp server. You do not need to log into the application in order to delete files.
To delete a file, right click the file within the remote site section that you would like to delete and click delete. The file will no longer be listed within your remote site list. It will also be updated to Deleted in the application.
NOTE: deleting your import file will delete any related export or update files within the list.
SFTP Support
Questions? Contact us at support@truencoa.com. Our team is happy to assist you with any issues you encounter.

